September 2021
After 10 years of wanting and needing a place to store our bikes, as well as having a suitable space to work on them regardless of the weather; my lovely and wonderful wife gave me a shiny new workshop for my 60th (gulp!) birthday. Thanks baby... you ROCK! I am a lucky boy indeed.

This driveway was once covered in an assortment of discarded yard debris, including; a small greenhouse, a compost pile, and a massive pile of rusting junk tangled in brambles and stinging nettles.
I worked for weeks cutting and chopping and burning brush to get the drive ready for the new building. I was quite pleased to see it turn out as it appears in the photo shown above. If you look closely, you can see too that I've laid out a few rocks to give myself an idea of where the corners of the building will be and how the building will fit. (hopefully!)
Soon enough, the "building" arrived.

Days 1 & 2: Delivery / check-in & staining - The building itself was a D.I.Y. kit from Shire; the Marlborough Log Cabin. The parts were delivered on a flatbed lorry, which fortunately could squeeze down our back lane where we then off-loaded everything onto the drive.
I'll be honest. At this point, I was pretty nervous about my abilities and getting the thing assembled correctly. Thems alotta parts.
I'll be honest. At this point, I was pretty nervous about my abilities and getting the thing assembled correctly. Thems alotta parts.

The delivery driver and I checked everything as we unloaded the truck, but the shipping manifest doesn't necessarily guarantee that I've got everything I need. The next very important process was to confirm that I had every component listed in the assembly instructions. This was a slow and time consuming process. I repeat; thems alotta parts.
However, I was very maticulous and laid out to the side each group of components so that I could properly count and loosely arrange them in order of assembly.
However, I was very maticulous and laid out to the side each group of components so that I could properly count and loosely arrange them in order of assembly.

Thankfully, everything was here (✓ for Shire!). I then began staining the roof planks and floor boards. I should add at this point, that I was very, very fortunate to have good weather.
Days 3 & 4: Staining front logs / Doors & window assembly - I moved onto the front logs. I wanted to get a good couple of coats on those as well, so that I wouldn't have to stain around the windows and doors. This was mostly for aesthetics, but it helped me oragnise the unusual components as well.
Days 3 & 4: Staining front logs / Doors & window assembly - I moved onto the front logs. I wanted to get a good couple of coats on those as well, so that I wouldn't have to stain around the windows and doors. This was mostly for aesthetics, but it helped me oragnise the unusual components as well.

And then while those dried, I began assembling the window and doors. Melanie got in on the job here by attaching all the glass trim. I was mighty impressed with her steady hands along with her hand-eye coordination to drive in the itty-bitty nails right along the edge of the glass. Good job, girl-friend!

Day 5: Runners and Wall assembly - With the doors and window completed, it was time to start putting it all together and to be fair it was pretty straight-forward. On three sides the logs are all the same size and length. They simply stacked together using tongue & groove joints along the edges.
Each corner is then notched in such a way as to alternate and interlock. It's a quite an ingenious system that makes the building surprisingly sturdy, despite not having to nail anything together. Think; Lincoln Logs, but with 2" x 4"'s. (✓✓ for Shire!)
Each corner is then notched in such a way as to alternate and interlock. It's a quite an ingenious system that makes the building surprisingly sturdy, despite not having to nail anything together. Think; Lincoln Logs, but with 2" x 4"'s. (✓✓ for Shire!)

With the floor runners properly spaced and screwed into place, We simply started stacking logs. When we had stacked five logs high, the doors and frame just slid into place. (Note: The doors were very heavy! We used every ounce of our combined strengths to fit the doors over the logs.)

As you can see from the the photos above and below, only the front logs had different widths (to fit around the door frame, between the window, and at the corners...). This meant that you had to pay careful attention whilst stacking each piece so that the logs aligned as you reached the top.
Day 6: Wall assembly v.2 - I learned this important consideration the hard way. Once we had assembled the building all the way to the top of the window, I had an extra piece... and yes, that was the piece that fit under the window! And because the sides all interlock; it all had to come down and we had to begin again.
Yes, I was in charge of reading the instructions and yes, the building looked like the image below — twice. The second time is a charm!

Day 7: Roof joists and boards - At this point in time we hadn't had ANY rain in over a week which is very unusual for Wales and I was kinda worried because I had yet to put on the roof! The inside had NOT been stained and was NOT waterproof. (Also of note: check out the pile of bare wood laying in the yard!)
To start the roof, Melanie and I had to lift the very heavy ceiling joists into place and secure them to the side gables. It wasn't a complicated job — just a heavy one lifting long beams whilst standing on ladders. Then I had to fit and nail all the roof planks together. Thankfully, I had stained them earlier and the tongue & groove joints slipped together like a dream. Bonus: it was a stunning day in the sun!
It was at this time that Melanie begain staining the remaining three outer sides to the workshop. Bless her heart, she spent hours on just one side before she was worn out. A few Google searches later; the decision was made to buy a spray gun.

Day 8: Stain, roof felt, insulation and floorboards - Thank goodness for Amazon Prime! The next day we had our new spray gun and Melanie went to town! Shockingly, she had the three sides stained within 30 minutes. "That spray gun is worth every penny." — Melanie
But on day eight it was definately looking like rain. Melanie helped me again with rolling out and measuring the roof felt. Tacking it on didn't take but a couple hours and surprisingly, I could say the workshop was watertight by noon! "Teamwork makes the dream work" — thanks baby!
I could then finally move inside. We spent a little extra money on floor insulation and now that the roof was on, I had to get that floor laid ASAP. Cutting the insulation was easy and the floorboards dropped in like a charm; again pre-cut to fit and taking little more than a few hours to nail down. (✓✓✓ for Shire!)

Days 9 & 10: Front porch and gutters - I spent the better part of a day fiddling with the porch assembly. I had to compensate for a large lump in the pavement just in front of the door so that rainwater would run the right direction. Having a porch installed makes a significant improvement to prevent water from getting under the building as well as giving the building a finished appearance.
Next, I wrestled and struggled with the gutters. They seemed straight-forward to install, but getting the correct angle for drainage, properly fitting the down pipes, brackets, and assorted connections took the better part of a day. Hands-down this was my least favourite part of the build.
Next, I wrestled and struggled with the gutters. They seemed straight-forward to install, but getting the correct angle for drainage, properly fitting the down pipes, brackets, and assorted connections took the better part of a day. Hands-down this was my least favourite part of the build.

Day 11: Vinyl and stuff - Being just a big square room, the vinyl was easy-peazy to cut and lay down. I then made a couple of simple racks from the leftover pallettes on which to hang our bikes. After that, it was just a matter of moving all our stuff from the back kitchen into the workshop.
Melanie ordered some inexpensive blinds to dress it up a bit — et voilá!
Melanie ordered some inexpensive blinds to dress it up a bit — et voilá!
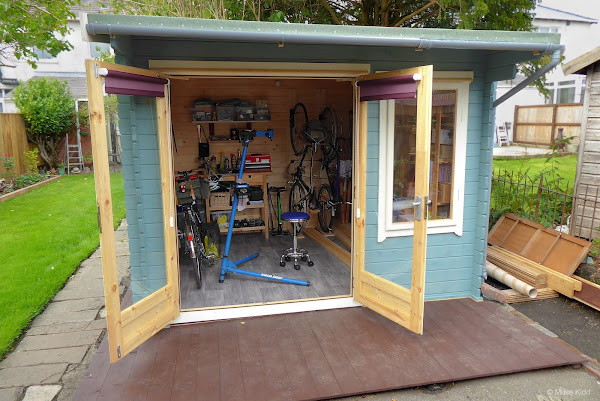
"Birchwood"... our new bike workshop!